Leaking tractor gas tank? Epoxy patch, tank sealer or a new tank
Published . Product limits are from each maker's own instructions; owners' experience is from the Yesterday's Tractors forum, linked in the sources.
The short answer
- Yes, J-B Weld can fix a small pinhole in a steel tank that does not flex: use a fuel-rated putty (TankWeld, or the SteelStik in J-B Weld's gas tank steps) on metal sanded bare and cleaned, and let it cure at least an hour. A short crack up to 4 inches suits a fiberglass kit such as Permatex's.
- Never weld, braze, solder or grind on a tank that has held gasoline unless it has been professionally cleaned and purged: the vapor inside is what explodes, not the fuel.
- Rust pinholes in several places, or rust inside the tank, call for a sealer poured in and sloshed around, which coats the whole inside.
- A split seam, a crack where the tank flexes, or metal rusted thin is a new-tank job. Owners report hard epoxy cracking loose where a tank moves.
First: no heat on a gas tank
Safety: OSHA's rule for welders is blunt: no welding, cutting or other hot work on a used tank until it has been cleaned so thoroughly that no flammable material is left, with every opening vented. An "empty" gas tank is full of gasoline vapor. Soldering, brazing, a torch and a grinder's sparks are all heat. This guide covers only repairs that use no heat.[1]
Work outdoors, away from any flame or pilot light, with the cap off so the tank vents. Permatex's instructions start the same way: remove the cap, make sure there is ventilation, and drain the tank or lower the fuel at least 2 inches below the damage.[4]
Which fix for which leak
Find the leak first. Dry the tank, then look for the wet spot or the dark stain where fuel has wicked through, and mark it. J-B Weld's own steps begin with exactly that: locate the leak and mark it with a pencil.[2]
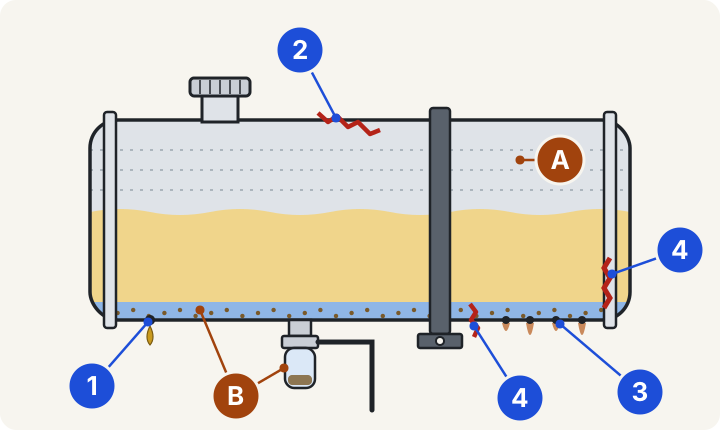
- 1. Single pinhole, bottom left (black dot with a yellow drip under it), in a flat steel panel. One pinhole or a small rust hole: fuel-rated epoxy putty on the outside.[3] [2]
- 2. Short crack, top of the tank (red zigzag right of the filler cap). A crack up to 4 inches, or a hole up to 3/8 inch: a fiberglass and epoxy kit.[4]
- 3. Row of rust pinholes, bottom right (four dots with rust stains under them). Pinholes in several places, or rust inside: a sealer that coats the whole inside.[5]
- 4. Split seam, crack by the strap (two red zigzags marked 4: right end, and floor just right of the strap). A split seam, or a crack where the tank flexes: replace the tank.[7] [8] [9] [10] [11]
- A. Vapor space (dashed area above the fuel). It holds gasoline vapor, even in an "empty" tank. No heat: no welding, soldering, brazing, torch or grinder.[1]
- B. Water and sediment (blue band and brown specks on the floor and in the sediment bowl). They settle to the bottom; Ford's 8N manual takes out the fuel shut-off valve to drain them.[6]
| Leak | Fix | Maker's limits |
|---|---|---|
| One pinhole or a small rust hole, steel tank | Fuel-rated epoxy putty on the outside (TankWeld, SteelStik) | Sets in 5 minutes, cures in about 1 hour (TankWeld). Degrease and roughen first; J-B Weld sands to bare metal.[3] [2] |
| A crack up to 4 in or a hole up to 3/8 in, metal tank | Fiberglass and epoxy kit (Permatex Fuel Tank Repair) | Metal tanks only, never plastic. Fuel level 2 in below the damage. Cures in 30 minutes at 50-75 F.[4] |
| Pinholes in several places, or rust inside | Tank sealer poured in and sloshed (for example Caswell) | Tank emptied, cleaned and dried first. Cures 24-36 hours at 70-90 F before fuel.[5] |
| Split seam, crack that flexes, metal rusted thin | Replace the tank | Owners report hard epoxy breaking loose where a tank flexes.[7] [8] [9] [10] [11] |
The table is our summary of the limits each maker prints, not a test. A fix that is right for a pinhole on a flat panel is wrong for a crack beside a mounting strap, so look at what is around the leak as well as its size.
Epoxy putty from the outside (the J-B Weld fix)
TankWeld is J-B Weld's putty sold for fuel tanks: the package says it is fuel- and ethanol-resistant, sets in 5 minutes, cures in 1 hour, and handles up to 148 C (about 300 F). Use a product the maker labels for fuel tanks, and wear gloves and eye protection, as the TankWeld label asks.[3] [2]
J-B Weld's own gas tank steps, with its SteelStik putty:[2]
- Locate the leak and mark it.[2]
- Drain the tank, or at least lower the fuel 2 inches below the leak (Permatex's rule for its kit), and leave the cap off.[4]
- Sand a few inches around it down to bare metal. That removes paint, rust and grime, and gives the epoxy a rough surface to grip.[2]
- Spray the area with cleaner (J-B Weld lists brake cleaner) and wipe it; repeat until it wipes clean.[2]
- Cut enough putty to cover the hole and a good margin past it, and knead it until it is one even color.[2] [3]
- Clean and dry the spot once more, press the putty into the center of the hole, and work it flat and smooth over it.[2]
- Let it cure fully before fuel touches it: at least one hour, says J-B Weld. Owners on the tractor forums give it overnight.[2] [7]
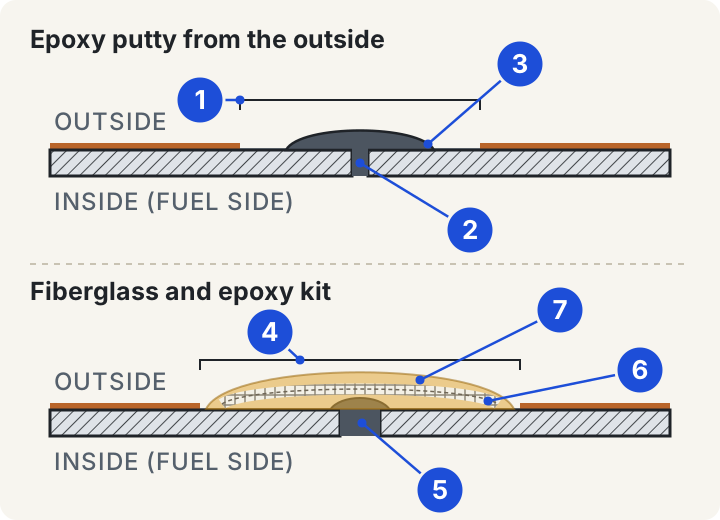
- 1. Sanded area (top bracket; the brown paint and rust stop at its ends). Sand to bare metal a few inches around the hole, then spray with cleaner and wipe until it wipes clean.[2]
- 2. Putty in the hole (dark plug through the steel). Press the putty into the center of the hole.[2]
- 3. Putty over the hole (dark dome on the outside). Work it flat and smooth over the hole and a good margin past it. Cure at least an hour before fuel touches it.[2] [3]
- 4. Sanded area (the wider bracket). Sand at least 1 inch past the damage and wipe with the kit's alcohol swab.[4]
- 5. Putty at the leak (dark plug in the hole, under the patch). Press a piece of the putty over the leak.[4]
- 6. Cloth edge (the gridded strip stops short of the bracket ends). Cut the cloth to fit inside the sanded area.[4]
- 7. Resin (amber layer under and over the cloth). Brush on resin, lay the cloth, brush on more until it is saturated. Cures in 30 minutes at 50 to 75 F; then refill.[4]
What owners report. In Yesterday's Tractors threads about exactly this repair, members describe patches that have held for years and others that softened or let go. Several say the same two things decide it: the preparation, and whether the metal flexes. These are owners' experiences, not tests.[7] [8] [9] [10] [11]
A fiberglass and epoxy kit (Permatex)
A kit such as Permatex Fuel Tank Repair lays a patch of fiberglass cloth in a fuel-resistant epoxy, which spans a crack better than a dab of putty. Its data sheet sets the limits: cracks up to 4 inches (10 cm) long and holes up to 3/8 inch (9 mm), on metal tanks only. It is not for plastic tanks and not a structural adhesive.[4]
- Lower the fuel at least 2 inches below the damage, cap off.[4]
- Remove oil, grease and dirt, sand at least 1 inch past the damage, and wipe with the alcohol swab.[4]
- Press a piece of the putty over the leak and cut the cloth to fit inside the sanded area.[4]
- Mix the resin in its pouch (no more than 2 minutes) and use it within 8 minutes: brush a layer on, lay the cloth, and brush on the rest until the cloth is saturated.[4]
- It hardens in 8 to 10 minutes and cures in 30, after which the tank can be refilled. Work at 50 to 75 F; colder takes longer.[4]
Sealing the tank from the inside
When there are pinholes in several places, or the inside is rusty, a patch on the outside treats one symptom. A tank sealer is a resin poured into the empty tank and sloshed around so it coats every inside surface. Forum members often suggest it after a patch, too: seal the spot, then line the tank.[5] [8]
Caswell's instructions for its sealer show what the job involves:[5]
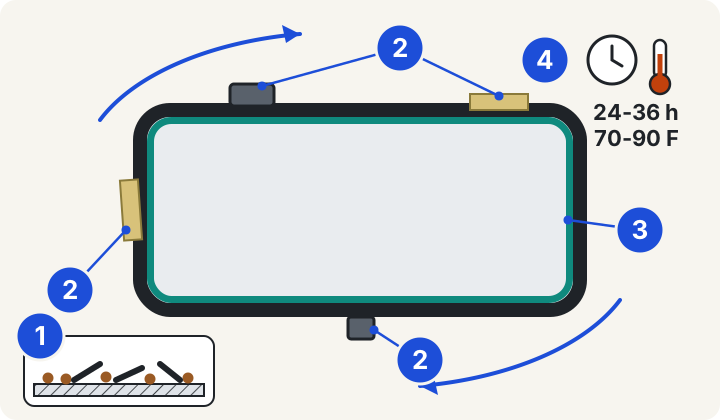
- 1. Rust clean-out (small panel, bottom left). In the empty tank, shake drywall screws in about a pint of acetone or lacquer thinner, 10 minutes at most. Dump it and let the tank dry. Both solvents are flammable.[5]
- 2. Tape, plug and cover (tan tape left end and top right; dark plug underneath; dark cover top left). Tape seams and holes outside, plug the outlet, cover the filler, so the sealer stays in.[5]
- 3. Sealer coat (teal line inside the wall). Mix the two parts exactly, pour it in, and turn the tank every direction (curved arrows) for several minutes to coat every surface. Drain the excess.[5]
- 4. Cure (clock and thermometer, top right). 24 to 36 hours at 70 to 90 F before any gasoline goes in.[5]
- Take the tank off the tractor (on an 8N it sits in the hood, which comes off first) and get every trace of gasoline and oil out.[6] [5]
- For a metal tank, Caswell shakes a handful of drywall screws in about a pint of acetone or lacquer thinner inside it to knock loose rust and scale, then dumps it and lets the tank dry. Caswell warns not to leave solvent in the tank more than 10 minutes. Those solvents are flammable too: work outdoors, away from flame.[5]
- Tape over weeping seams and holes from the outside, and plug the outlets, so the sealer stays in.[5]
- Mix the two parts exactly (2 to 1 by Caswell's measure); the maker calls bad mixing and measuring the number one cause of failure. Pour it in, cover the filler, and turn the tank in every direction for several minutes, then drain the excess.[5]
- Cure it 24 to 36 hours somewhere warm (70 to 90 F) before any gasoline goes in.[5]
- Afterward, Caswell says to avoid fuel additives that contain methylene chloride or mineral spirits.[5]
Every sealer has its own chemistry and steps, so follow the instructions in the kit you buy.
When to replace the tank instead
- A crack that flexes. Owners on the forums say a hard epoxy breaks loose where a tank moves, at a seam, a strap or a mounting tab, and suggest a sealant that stays flexible if you try a patch at all.[7] [8] [9] [10] [11]
- A split seam or metal rusted thin. A patch needs solid, bare metal to grip; Permatex limits its kit to cracks up to 4 inches and holes up to 3/8 inch.[4] [2]
- A plastic tank. Permatex's kit is not for plastic. Caswell's sealer instructions do cover plastic and fiberglass tanks; otherwise replace it.[4] [5]
- Rust flakes that keep coming. If the sediment bowl keeps filling with scale, the inside needs cleaning and sealing or a new tank, whatever is done to the outside.
Keep the next leak away
Ford's own manual for the 8N tells owners to refill the tank at the end of each day's work (section 343): a full tank holds less moist air, so less water condenses inside it. When fuel stops reaching the carburetor, Ford's first check is for water (section 223): take out the fuel shut-off valve and drain the water and sediment from the bottom of the tank, letting a frozen tank warm up first.[6]
For winter storage, Ford's steps are to drain the tank and leave the cap off so air can move through it (section 131).[6]
If you keep fuel in the tank over winter instead, treat it with stabilizer and run the engine so the treated fuel reaches the carburetor, as the small-engine makers advise in our small engine storage guide.
Products named on this page: J-B Weld TankWeld putty | Permatex fuel tank repair kit | Gas tank sealer kit
As an Amazon Associate ServiceSage Auto earns from qualifying purchases.
Track your tractor free: add it as an older gas tractor and get its service schedule from Ford's 8N manual, plus a fall storage and spring start-up checklist by email.
Gas tank repair questions
Will J-B Weld fix a leaking gas tank?
On a small pinhole in steel that does not flex, often yes, if the spot is sanded to bare metal and cleaned first. Use the version J-B Weld sells for fuel tanks (TankWeld, or SteelStik in its gas tank instructions) and let it cure fully, at least an hour by the maker's instructions, before fuel touches it. Owners report patches lasting for years and others softening or cracking loose, especially where the tank flexes.
Is it safe to weld or solder a gas tank?
Not as a home job. OSHA bars welding, cutting or other hot work on a used tank until it has been cleaned so thoroughly that nothing flammable is left and it has been vented. An empty gas tank still holds gasoline vapor, which is what explodes. A radiator or tank shop that cleans and purges tanks is the place for that work.
How big a hole can a fuel tank repair kit fix?
Permatex rates its Fuel Tank Repair kit for cracks up to 4 inches long and holes up to 3/8 inch across, on metal tanks only. Bigger damage, a split seam or a plastic tank needs a different repair or a new tank.
How long before I can put gas back in after a repair?
It depends on the product. J-B Weld says at least one hour for its putty, Permatex says 30 minutes or when the patch is tack free, and Caswell's inside sealer needs 24 to 36 hours in a warm place. Owners on the tractor forums often leave an outside patch overnight.
Should I seal the inside of an old tractor gas tank?
When there is rust inside or pinholes in several places, yes: a patch on the outside fixes one spot, while a sealer coats all of it. The tank has to be emptied, cleaned of rust and dried first, the two parts mixed exactly, and the sealer left to cure before fuel goes in.
How do I keep water out of a tractor gas tank?
Ford's 8N manual says to refill the tank at the end of each day so less moist air sits in it to condense, and to drain water and sediment out through the fuel shut-off valve when fuel stops flowing.
Sources
- 29 CFR 1910.252(a)(3), Welding or cutting containers (OSHA, via Cornell LII)
- J-B Weld, Seal a Leaky Gas Tank (project steps, SteelStik)
- J-B Weld TankWeld epoxy putty package instructions (8217AUS, the Australia/NZ package), via a retailer
- Permatex Fuel Tank Repair (09101) technical data sheet
- Caswell, Gas Tank Sealer Instructions
- Ford Motor Company, Ford Tractor Model 8N Operator's Manual (1950, 3729-50-M), sections 131 (storage), 223 (fuel system) and 343 (fuel tank) (scan on the Internet Archive)
- Yesterday's Tractors forum, JB Weld Gas Tank
- Yesterday's Tractors forum, Fuel resistant adhesive
- Yesterday's Tractors forum, Removing JB QWIK Weld
- Yesterday's Tractors forum, Glue for a gas tank?
- Yesterday's Tractors forum, gas tank fix